Mistakes happen more often than anyone wants to admit. The Joint Commission found that issues with instrument reprocessing contributed to 79% of infection-related sentinel events reviewed between 2009 and 2018. Yet most sterile processing errors never make headlines. They compromise patient outcomes, drive up healthcare costs, and leave surgical teams working with equipment they assume is safe.
The gap between adequate and exceptional sterile processing comes down to specific habits, knowledge, and attention to points where most people cut corners. Let’s unpack this.
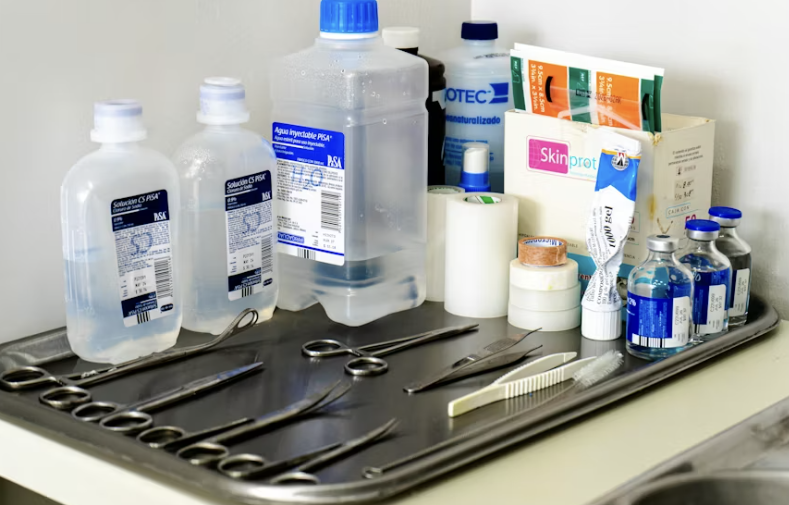
The Bioburden Shortcut: When Pre-Cleaning Gets Skipped
Dried blood on a surgical instrument is a sterilization failure waiting to happen. The moment a contaminated instrument hits air, proteins begin to denature and bond to metal surfaces. After 20 minutes, this bioburden becomes exponentially harder to remove.
The best professionals treat pre-cleaning as non-negotiable, even when the OR is backed up, and cases are running late. They know that skipping or rushing this step means the enzymatic detergent in the washer won't reach instrument surfaces effectively, and that autoclave steam can't sterilize what it can't touch.
"Loaner sets represent one of the highest-risk points in sterile processing. You're trusting vendors who may have different cleaning protocols, different quality standards, and no accountability if something goes wrong. The assumption that these instruments are ready for processing has led to multiple outbreaks."
– Hank Balch, MS, CRCST, CHL, CIS, Past President of IAHCSMM
Research published in the American Journal of Infection Control found that 15% of surgical instruments that appeared clean to the naked eye still harbored protein residue detectable through ATP testing. Those proteins create a barrier that protects microorganisms during the sterilization cycle.
Sterile processing techs should develop specific habits around pre-cleaning:
- Keep enzymatic solution in the OR for immediate treatment of lumens and box locks.
- Pre-soak instruments in solution within three minutes of contamination when possible.
- Treat every scope channel and every crevice of a rongeur with the same urgency you'd want if your family member were the next patient.
Temperature Traps: The Degree That Enables or Breaks Down Sterilization

Steam sterilization parameters are based on the thermal death point of the most resistant organisms. A sterilizer running at 270°F instead of 272°F might seem close enough, but those two degrees represent the difference between effective sterilization and potential contamination.
The Association for the Advancement of Medical Instrumentation (AAMI) sets strict requirements: 270°F for 4 minutes minimum in a gravity displacement sterilizer, or 273°F for 3 minutes in a pre-vacuum sterilizer. These numbers account for heat penetration time and the inactivation kinetics of bacterial spores.
Placing packs too close together, overloading a chamber, or blocking steam flow creates cold spots where instruments never reach required temperatures. The sterilizer reads the temperature at one probe point – not across every instrument in the load.
The correct procedure is to leave space between packs, position basins on their edges, and place instrument trays flat with perforated bottoms facing down. They run biological indicators in the most challenging spots in the load.
Want to develop habits that prevent these errors? Health Tech Academy's 16-week Sterile Processing Program teaches the principles behind the parameters, so techs understand why attentiveness carries weight and how to troubleshoot when something looks off.
Hear from One of Our Students
Why Outside Instruments Demand Extra Scrutiny
Loaner instrumentation for spine, orthopedic, and cardiac procedures creates challenges. These sets arrive from vendors, often hours before surgery, and techs face pressure to process them quickly. That urgency leads to dangerous assumptions.
A study in the Journal of Hospital Infection examined 200 loaner instrument sets and found that 43% arrived with visible soil still present. Another 28% had instruments that were damaged or showed signs of corrosion that would prevent effective sterilization. Yet these sets went straight into ORs because nobody in the sterile processing department caught the issues.
The best techs approach every loaner set with healthy skepticism:
- They unpack and inspect every instrument individually, checking for tissue, blood, corrosion, and damage.
- They run loaner sets through a complete decontamination cycle regardless of vendor claims about pre-cleaning.
- They document everything and don't hesitate to delay a case if instruments aren't safe to process.
"Loaner sets represent one of the highest-risk points in sterile processing. You're trusting vendors who may have different cleaning protocols, different quality standards, and no accountability if something goes wrong. The assumption that these instruments are ready for processing has led to multiple outbreaks."
– Hank Balch, MS, CRCST, CHL, CIS, Past President of the International Association of Healthcare Central Service Materiel Management (IAHCSMM)
Instruments in loaner sets often include complex designs that require specific reprocessing instructions. Without manufacturer's IFUs (Instructions for Use) being readily available, techs might use the wrong cleaning method, wrong sterilization parameters, or miss critical disassembly steps.
Wet Pack Panic: When Speed Trumps Safety
A damp pack should never leave a sterile processing environment. Yet facilities report wet pack incidents regularly because the pressure to turn instruments around quickly overrides proper protocol.
Water creates a pathway for microorganisms to travel through packaging material. A pack that feels slightly damp might have wet contents inside, where bacteria can multiply in the warm, moist environment. Steam sterilization eliminates microorganisms, but it doesn't create a sterile barrier if packaging integrity is compromised.
If techs remove packs too quickly or stack them before they've cooled completely, condensation forms and moisture gets trapped. This is why drying protocols need to be followed without exception:
- Leave packs in the sterilizer chamber for the full recommended cooling period.
- Place packs at least three inches apart on cooling racks.
- Never stack warm packs or place them on cool metal surfaces where temperature differences create condensation.
When a wet pack does occur, document it, investigate the cause, and reprocess the entire load if necessary.
Chemical Indicator Confusion

Those little strips and dots inside sterile packs are critical tools for confirming exposure to sterilization conditions. But many techs don't understand the difference between chemical indicators and biological indicators, or what passing results mean.
Chemical indicators change color when exposed to certain parameters (time, temperature, and steam). A Class 4 chemical indicator confirms that a pack reached specific conditions, but it doesn't confirm sterility. Only biological indicators (living bacterial spores) can confirm that sterilization occurred.
The biggest mistake is trusting a color change without considering other factors. An indicator might change color in a load that had air entrapment issues or insufficient exposure time. The indicator responds to the conditions it experienced locally, which might differ from conditions elsewhere in the load or chamber.
Run biological indicators on every load type, at least weekly for routine loads and with every load for implants. Document results meticulously and know which chemical indicator class belongs with which sterilization method. Investigate any indicator that doesn't respond as expected, rather than assuming it was defective.
Sterile Processing Scope Reprocessing

Flexible endoscopes represent one of the highest-risk reprocessing obstacles in healthcare. Their complex internal channels, delicate materials, and specific manufacturer requirements create multiple points where errors can occur.
The Food and Drug Administration (FDA) receives about 400 Medical Device Reports annually related to patient infections and device contamination from improperly reprocessed endoscopes. Yet audits consistently show that reprocessing protocols aren't followed completely, even in accredited facilities.
Proper scope reprocessing involves:
- Leak testing.
- Manual cleaning of external surfaces and all channels.
- High-level disinfection or sterilization.
- Rinsing with treated water.
- Drying channels with forced air.
- Executing storage in a way that prevents recontamination.
Skip one step or execute it incorrectly, and contamination risks spike.
Treat scope reprocessing like a surgical procedure. Brush every channel the specified number of times and verify flow through each channel. Time high-level disinfection carefully and know that "close enough" isn't acceptable when patients are having scopes inserted into sterile body cavities.
CRCST Certification Preparation
The Certified Registered Central Service Technician (CRCST) certification through the International Association of Healthcare Central Service Materiel Management (IAHCSMM) validates that a technician has the skills to understand the fundamental principles of decontamination, sterilization, and quality assurance.
Certification preparation forces techs to learn the "why" behind every protocol. Understanding why biofilm forms in lumens, why certain materials require specific sterilization methods, or why chemical indicators have different classes means techs can adapt when situations go awry.
Not sure if you're ready for the CRCST certification? Take our free practice exam to assess your knowledge and identify gaps before you commit to anything.
Building a Culture of Sterile Vigilance
The sterile processing department doesn't see the patients whose lives depend on their work. That distance makes it easier to rationalize corner-cutting when pressure mounts. Techs bridge that gap by connecting their daily actions to patient outcomes.
They ask questions when manufacturer's IFUs seem unclear. They speak up when they notice co-workers taking risks. They treat every instrument set like it's heading to the OR for their own surgery. They understand that preventing one infection justifies the extra minutes spent on proper reprocessing.
Frequently Asked Questions and Answers
What Happens if a Surgical Instrument isn't Properly Sterilized?
Improperly sterilized instruments can transmit bacteria, viruses, prions, and other pathogens to patients during surgery. This leads to surgical site infections, bloodstream infections, and in rare cases, transmission of diseases like hepatitis or Creutzfeldt-Jakob disease. Even minor contamination can compromise patient outcomes and extend hospital stays.
How Often Should Biological Indicators be Used in Sterilizers?
AAMI standards require biological indicators (BI) in every load containing implants and at least weekly for routine loads in each sterilizer. Many facilities run BIs daily as part of quality assurance programs. Each sterilizer type requires specific BI formulations matched to the sterilization method.
What's the Difference Between Cleaning, Disinfection, and Sterilization?
Cleaning removes visible soil and organic material but doesn't kill microorganisms. Disinfection kills most pathogens but not necessarily bacterial spores. Sterilization eliminates all forms of microbial life, including spores. Critical instruments that enter sterile tissue require sterilization, while semi-critical items that contact mucous membranes require, at minimum, high-level disinfection.
Can You Sterilize Instruments without Cleaning Them First?
No. Sterilization cannot occur if bioburden (blood, tissue, or proteins) remains on instruments. Organic material creates barriers that prevent steam, gas, or other sterilants from reaching instrument surfaces. Cleaning is the most critical step in reprocessing and must occur before sterilization.
How Long does CRCST Certification Take to Complete?
Preparation time varies based on prior experience and study habits, but most students spend 3-6 months preparing for the CRCST exam. Health Tech Academy's Program provides structured learning that can be completed at your own pace, with most students ready to test within 16 weeks.
What Should You do if You Find an Error in Sterile Processing after Instruments have Been Sent to the OR?
Immediately notify the charge nurse and nurse manager. Do not wait. The surgical team needs to know that instruments may be compromised so they can determine whether to proceed with alternative instruments or delay the case. Document the error thoroughly and participate in root cause analysis to prevent recurrence.